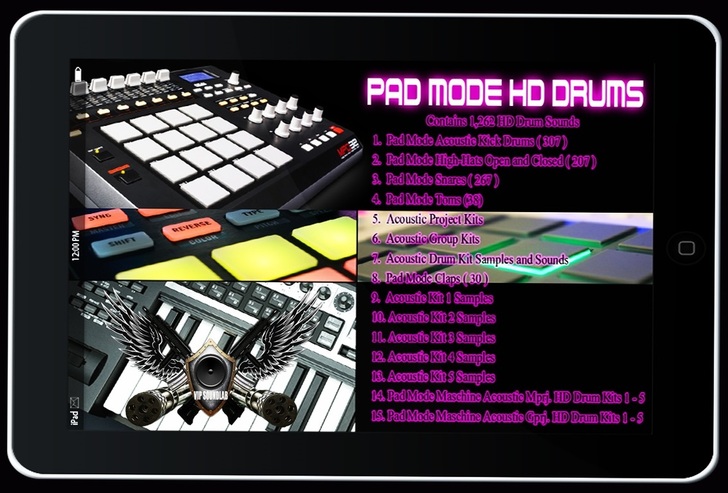
New !!! Are you a Maschine & Maschine Studio Fanatic ?? Well its time to smash those pads with Big Drum Sounds along with the power of Maschine ! The perfect Drum Kit for any producer. You are only moments away from getting this amazing Drum Kit & Maschine 1.8/2.0 Expansions. This kit is power packed with 1, 262 HD Drum sounds and maschine ready kits. We’ve gone through some of our best-and most powerful sounds to bring you this collection of pristine studio quality sound. Professionally mixed and mastered by the pros, plus we provided quick load Maschine kits for the most popular software samplers.
These drums are essential for all and any style music producer. Make your productions shine with the pro caliber sounds in this kit. These Sounds work excellent with Hip Hop and Dance Productions as these Samples are designed to be your 'go to' starter sounds for any style needed. Spend less time choosing sounds and more time making hot tracks smashing those pads with high definition, industry-standard drums sounds, including custom Maschine Drum Groups for the Native Instrument's Maschine 1.8/2.0 for fast track construction.
Genre: Trap, Old School, Hip Hop, Gangsta Rap, G-Funk, R&B,
Soul, Nu-Jazz, Blues, Club, Pop.
Contains 1,262 HD Drum Sounds
1. Pad Mode Acoustic Kick Drums ( 307 )
2. Pad Mode High-Hats Open and Closed ( 207 )
3. Pad Mode Snares ( 267 )
4. Pad Mode Toms (38)
5. Acoustic Project Kits
6. Acoustic Group Kits
7. Acoustic Drum Kit Samples and Sounds
8. Pad Mode Claps ( 30 )
9. Acoustic Kit 1 Samples
10. Acoustic Kit 2 Samples
11. Acoustic Kit 3 Samples
12. Acoustic Kit 4 Samples
13. Acoustic Kit 5 Samples
14. Pad Mode Maschine Acoustic Mprj. HD Drum Kits 1 - 5
15. Pad Mode Maschine Acoustic Gprj. HD Drum Kits 1 - 5
Price $ 20.00
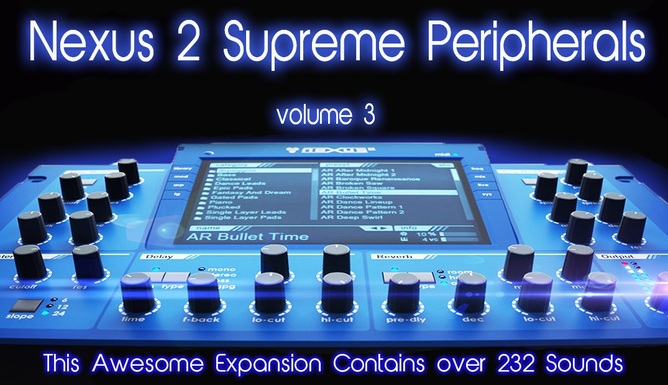
Our final series for our Nexus 2 expansions with Magnetic, uplifting leads, arpeggios, pads, basses, plucked, pads, just waiting to light up your productions . Get your hands on a complete library of incredible sounds to expand your Nexus Arsenal with over 232 sounds in FXB. Format. Bring the Industry standard Quality needed in today's music of a next generation ROM synthesizer-plugin that delivers a level of sonic quality unsurpassed by even the highest end hardware. This Expansion is Designed for nexus 2 and loads with no problems or hiccups just download and add to your Nexus Content folder and you are ready to jam ! Whats in the expansion ? Take a look -
THIS AWESOME EXPANSION CONTAINS OVER 232 FXB. FORMATTED NEXUS 2 INSTRUMENTS
Price $ 20.00
THIS AWESOME EXPANSION CONTAINS OVER 232 FXB. FORMATTED NEXUS 2 INSTRUMENTS
Price $ 20.00
Now you can Bundle and save by bundling volumes 1 & 2 or you can Bundle and save by Bundling all 3 Nexus 2 Expansions. When you bundle all 3 Expansions you get 1,364 Nexus 2 Expansions !!
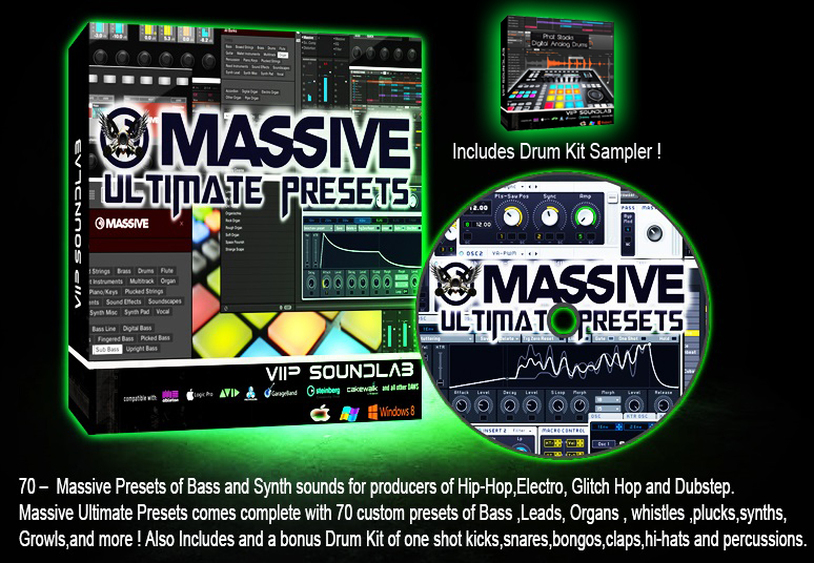
Why use Presets ?? a lot of times as a producer when creating a new sound you can get producers block looking for a new sound. Some may feel its to " cookie cutter" or " generic " but in fact a Preset is a good way to find inspiration by looking at how that sound was made. Are you having producers block ??Sometimes all it takes is the smallest sound to get the creative juices flowing again, and what could be easier than loading synth presets! This collection comes with 70 Massive Presets of Bass and Synth sounds for producers of Hip-hop, Electro,Glitch Hop and Dubstep. This Massive Ultimate Preset collection comes complete with 70 custom preset of bass , leads , organs, whistles, plucks, synths, Growls and more. Includes a Bonus Drum Kit Sampler of our new Digital Analog Phat Stacks Drum kit. Also includes an extra folder full of bongos,claps,high-hats and percussion's.
Genre: Trap, Old School, Hip Hop, Gangsta Rap, G-Funk, R&B,
Soul, Nu-Jazz, Blues, Club, Pop,Electro,Glitch Hop and Dubstep
Genre: Trap, Old School, Hip Hop, Gangsta Rap, G-Funk, R&B,
Soul, Nu-Jazz, Blues, Club, Pop,Electro,Glitch Hop and Dubstep
Price $ 20.00

The VIP SOUNDLAB is proud to present this Explosive Kit of Sounds!! This kit is a mix of High Quality Drum Samples that make it easy to to get that hard hitting Knock on your Tracks. We used some the best and amazing compressors in the game to give you these Banging Kicks, Crispy High Hats , Thumping Kicks , bass heavy 808's and 909's , and more !! Your Studio will Explode with over 1,923 HD Banging sounds custom mixed to perfection. We present to you the “The Big Bang Theory Drum Kit” ok so what is this Kit about ?? its about making making Drums sound louder !! Loudness seems such a simple concept the higher the acoustic level, the greater the excursion of the eardrum, and our brains interpret this as meaning louder. So, you push a fader up or apply an EQ boost and things get louder; drag it down or cut frequencies and things become quieter. But your perception of loudness depends on much more. It’s perfectly possible for two pieces of audio that a meter tells us are equal in level to be very different in perceived volume. We learned a special technique from a awesome in house producer on how to make drum sounds louder to the ear with out effecting the drum sound quality. The tuning and choice of sounds was key to give your ears the Perception of Louder and Thicker sounds !! This technique will get your beats and production noticed faster with its powerful and explosive sound, therefore we used this method on this amazing Studio Quality Collection and we call it the Big Bang Theory. This is where all the sounds will start in your next production to give you a universe full of powerful and Loud Drum sounds !! this Kit is Radio ready in a clear Pristine 24-Bit HD Sound Format and get this we packed in OVER 1,923 HD SOUNDS all hand crafted , all radio ready to inspire your next hit record.
Genre: Trap, Old School, Hip Hop, Gangsta Rap, G-Funk, R&B,
Soul, Nu-Jazz, Blues, Club, Pop,Electro,Glitch Hop and Dubstep
The Big Bang Theory Drum Kit Contains over 1,943 Big Sounds !!
1) Bang Theory { 27 Banging FX }
2) Bang Theory { 83 Banging 808's & 909's }
3) Bang Theory { 3 Snaps }
4) Bang Theory { 27 Crispy Shakers }
5) Bang Theory { 40 Crispy Claps }
6) Bang Theory { 44 Banging Toms }
7) Bang Theory { 53 Bangin Percussion }
8) Bang Theory { 72 Crashes and Cymbals }
9) Bang Theory { 461 Banging Snares }
10) Bang Theory { 514 Crispy Hi-Hats }
11) Bang Theory { 599 Bangin Kicks }
12 ) Bonus !! Includes 4 Maschine 1.8/2.0 Ready Bang Theory Kits !!!
The Fully Loaded , Official Fresh !!!!
New Low Price !! $20.00
We went to a major Studio in Atlanta to have this work done and the Results are amazing. The Drum Sounds have a Warm and Punchy clean sound and ambient on others. we experimented in side chain compressing sounds , parallel compressing others and many more methods in the past so we used the same techniques again and used what we learned by todays pros to bring you these Hard Hitting Drum Sounds. Once again we went back to the bang !! These sounds come Directly from the The SSL 4000 Studio Console that delivers central control of the SSL EQ a four-band equalizer,and the SSL G Series EQ292, and we took advantage of how it offers greater gain change than the E-Series EQ, and a slightly different curve. We also used The SSL G-Equalizer pre-boost dip and a pre-cut rise, as well as a broader Q to bring the Hard Hitting Drum Sounds Producers Need. Dont watse time and money on watered down sounds when you can get over 2,000 Studio Quality HD Drum Sounds Right Here.
Genre: Trap, Old School, Hip Hop, Gangsta Rap, G-Funk, R&B,
Soul, Nu-Jazz, Blues, Club, Pop,Electro,Glitch Hop and Dubstep
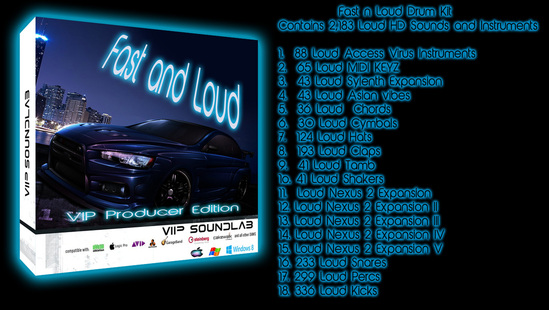
Fast n Loud Drum Kit Contains 2,183 Loud HD Sounds and Instruments
1. 88 Loud Access Virus Instruments
2. 65 Loud MIDI KEYZ
3. 43 Loud Sylenth Expansion
4. 43 Loud Asian vibes
5. 36 Loud Chords
6. 30 Loud Cymbals
7. 124 Loud Hats
8. 193 Loud Claps
9. 41 Loud Tamb
10. 41 Loud Shakers
11. Loud Nexus 2 Expansion
12. Loud Nexus 2 Expansion II
13. Loud Nexus 2 Expansion III
14. Loud Nexus 2 Expansion IV
15. Loud Nexus 2 Expansion V
16. 233 Loud Snares
17. 299 Loud Percs
18. 336 Loud Kicks
New Low Price !! $ 15.99
Genre: Trap, Old School, Hip Hop, Gangsta Rap, G-Funk, R&B,
Soul, Nu-Jazz, Blues, Club, Pop,Electro,Glitch Hop and Dubstep
Fast n Loud Drum Kit Contains 2,183 Loud HD Sounds and Instruments
1. 88 Loud Access Virus Instruments
2. 65 Loud MIDI KEYZ
3. 43 Loud Sylenth Expansion
4. 43 Loud Asian vibes
5. 36 Loud Chords
6. 30 Loud Cymbals
7. 124 Loud Hats
8. 193 Loud Claps
9. 41 Loud Tamb
10. 41 Loud Shakers
11. Loud Nexus 2 Expansion
12. Loud Nexus 2 Expansion II
13. Loud Nexus 2 Expansion III
14. Loud Nexus 2 Expansion IV
15. Loud Nexus 2 Expansion V
16. 233 Loud Snares
17. 299 Loud Percs
18. 336 Loud Kicks
New Low Price !! $ 15.99

Secrets to EQ'n Bass for Hip Hop
As a Hip Hop Producer, one thing you must learn to respect is the power of bass and how it can control your entire mix for better or worse. So, for the benefit of your mixes, take note of these important tricks of the trade we reveal below:
1) Bass frequencies are omnidirectional. This means the lows within bass instruments contain a lot of power and energy, so powerful they can control the overall output of the master mix level. Plus, your bass track should almost always be panned in the center. Panning your bass other than to the center is senseless, as it will only generate a mix that is lopsided and artificially hot on one side.
2) Don't EQ your bass with the same frequencies as you used on your kicks. For example, if you boosted 40-80hz in your kick tracks, then boost around 120hz for your bass, or vice versa. It's very important to avoid accumulation of the same frequencies when dealing with lows as these tracks control the overall output level of your mix. By assigning different frequency settings to each low end track, your overall mix level can become louder.
3) Boosting a particular frequency on a kick track, calls for cutting the same frequency by the same amount on your bass track. Specifically, when boosting 80Hz on a kick track, be certain to cut 80Hz by the same amount on your bass track. Likewise, if you boosted 130Hz on your bass track, cut by the same amount and frequency on your kick track. This secret technique will give your song a far more sculpted low end sound, allowing for a hotter overall mix.
Top Compression Methods Revealed
Ready to achieve optimum, punchy, in-your-face, hip hop compression settings for a kick? a snare? bass? percussion? Learn what compressor settings platinum hip hop producers use below...
1) Ratio & Threshold settings dictate amount: Heavy weight producers use Ratio settings 4:1 to 7:1 for most hip hop applications. Ratios 8:1 & above are more effective for limiting, not compression. For Threshold settings, the Pros use anywhere from 10db to 15db of gain reduction on kicks, snares, percussion, bass, or guitar. After you set the ratio and threshold, the real power comes in with your attack and release settings...
2) Attack times dictate snap: To ensure the most punch per track in your mix, you need to assign each track it's own compressor attack settings one at a time. Starting with the kick, set your attack to its slowest possible setting. Next, increase the time of the attack until the kicks timbre dulls slightly. Once you've reached this point, decrease the attack time slightly to un-dull the kick timbre and leave it at that setting. Repeat this method for all other tracks you wish to add optimum punch to!
3) Release times dictate recovery: Now that you've optimized the attack for each individual track needing punch, now you must assign each track its own release setting, too. Again, starting with the kick, set your release to its fastest possible setting. Next, decrease the time of the release until you hear the compression fully recovers the kick's volume before the next kick pulse begins. Repeat this method for all other tracks needing optimum volume recovery!
Optimize Beats by Eliminating 'Beats'
Note: The techniques below should only be applied when monitoring with a quality subwoofer, preferably no smaller than 10". While you may attempt to apply the same techniques using 8" nearfield monitors, we cannot guarantee the same results nor can nearfield monitors compare to the accurate low frequency monitoring a subwoofer provides.
When monitoring mixes through a full professional setup including quality 8"-10" nearfield monitors coupled with a 10"-12" subwoofer, we may be surprised just how much low frequency clutter really exists that simply cannot be heard on smaller setups. But once you are able to hear the overbearing and conflicting low end war going on in your mix, you can finally start correcting those errors resulting in a much cleaner and level-optimized mix!
First and foremost, is learning what a "beat" is. And NO...we are not talking about a "beat" as in a "drum beat", we're talking of something entirely different...
When the frequency of 2 similar instruments within a song are very close in pitch, but not in exact tune with one another, an undesired artifact is born, causing an adverse, secondary low frequency wave to modulate called a "beat". In acoustics, a "beat" is an interference between two sounds of slightly different frequencies. Avoiding "beats" is particularly important when mixing kicks, sub-bass, and bass guitar instruments within a full production. This is because lower frequency tracks make pitch conflicts stick out like sore thumbs if not tuned with each other. Higher frequency tracks are usually less-problematic when it comes to pitch conflicts.
To eliminate "beats", the most favorable approach is to tune all low-end, non-melodic tracks (drums and percussion) to the first musical note in the key of your song, known as the root "tonic". Correcting all these subtle pitch conflicts will deliver the most harmonious interaction between all the low-end non-melodic & melodic instruments in your mix!
Prized Background Vocal Techniques
You've put in some hard work to achieve the perfect lead vocal mix. Now, it's time to bring the song to a new level by adding the background vocals to the mix! Below are some great unknown tips on how to attain some prized background vocal textures...
1) Add Silk: Unlike the up front, full-bodied texture of your lead vocal track, take a different complimentary approach with your backing vocals. Add some silk by applying an overall high-pass filter as high as 900hz to the background vocals. The higher the high-pass, the more sheen and silky the texture becomes. Also, for even more sheen, boost 11-12khz 1-4 decibels using high-shelf EQ.
2) Add Depth: To ensure a large impressive sound, you need to record several tracks of background vocals: double takes, triple takes, as well as stacking harmonies. Take advantage of this multi-tracking by assigning each track its own panning placement. For example, pan low vocal/harmony tracks hard left & right. Next, pan medium vocal/harmony tracks 75% left & 75% right. Lastly, pan high vocal/harmony tracks 40% left & 40% right. Now your backing vocals will hug around your lead vocal perfectly!
3) Add Distance: To further add contrast apart from your lead vocal, apply different effects settings to your background vocal tracks. Typically, heavier effects should be applied to background vocals when compared to lead tracks. This helps add distance & a unique character apart from your lead mix. Some good background effects to apply are subtle ping
Mix Methods used by Top Producers
Building a great mix starts with organizing how you approach it. To ensure you achieve the best mix possible, break down your mix using the same methods the top music producers use. Below, these steps offer the following mix methods to help you avoid rushing or losing focus on achieving the best sound:
1) Place priority on mixing the drums & bass first. Achieving a solid drum & bass foundation gives your mix a strong backbone. Take it from us, if you focus on the drums and bass first, the rest of your mix will naturally fall into place.
2) Even though many producers mix the entire instrumental song before adding in the lead and background vocals - it's a big mistake! After you've built the drum and bass mix, we recommend moving straight into placing your lead vocal tracks into the heart of it. Build a solid mix with these 3 components first, before adding in your other tracks.
3) After the drums, bass, and vocals are solid, add in your other melodic tracks such as guitar, piano, strings, etc. Leave out any percussion or sound effects at this point. Pan these melodic tracks around the lead vocal, finding a pocket for each addition. Make sure not to compete for the lead vocals attention, but instead support the vocals as complimentary.
4) Save the percussion and sound effects tracks for last. Typically, it's wise to pan these last tracks outside your drums, bass, vocal, and melodic tracks. Use your percussion and effects tracks to fill spaces in the mix that seem unbalanced. By this last step, your mix should be well shaped and balanced following these steps!
Tune to the Tonic & Maximize Mixes
When producing Hip Hop, the single most important aspect of the drum mix is the kick. When mixed correctly, the kick serves as a solid foundation behind the whole production. However, what most engineers & producers do NOT know is that there is more to mixing kicks than mere choice of samples, compression settings, & EQ.
Hardly discussed at all, is the secret technique used by Pros where the kicks in a mix are finely tuned to the first musical note (tonic) of a song's key. "What's the big deal about tuning a kick to the key of my song?" you might ask. Well, it's a very big deal! In fact, applying this technique correctly can set a producer apart from the sea of amateurs for evermore...
The fact is kicks DO have pitch, low frequency pitch. Therefore, in terms of a kick's pitch embedded within a song's own key signature, a kick can either work against or with the resonance of your entire mix. And perhaps even more important, without tuning a kick to the song's tonic, the entire output level of your mix will forever remain un-optimized!
What do we mean? We mean "out of tune" kicks equal a forced lower output due to low end pitch & frequency conflicts. In other words, you'll never be able to truly maximize the output of any mix until your kick resonates with the key of the song at hand. Once the kicks in a mix resonate where their pitched oscillations match the song's natural key & primary frequency, the song's dynamic range & output level potential expand greatly!
Having just introduced this powerful yet highly guarded technique, there are several crucial aspects you must learn one-by-one.
Before diving into further details on "Tune to the Tonic", let's quickly mention how building & constructing kicks may actually involve layering 2 or more kick samples together. For example, you may find that using one kick sample only can't meet all your needs. You may need to layer 2 or more kicks to achieve an overall desired "kick sound". One kick may be chosen for its low end while another kick is layered over the first kick for its upper range attack or high end ambience. Layering kicks like this is fine. However, the more kicks you use, the more attention you must give to tuning each kick's pitch to the first musical note (tonic) of the song's key.
First, starting with a main kick, choose one that has an identifiable low end pitch. Kicks primarily consist of low frequency sound waves in which there is a main, underlying root pitch which can be heard as the loudest (and usually the lowest) frequency above all other combined tones. This loudest frequency is called the "tonal resonance". Once you find and identify the kick's tonal resonance, you'll need to make the kick "resonate".
You can make a kick resonate by fine tuning the kick until its loudest and lowest tonal pitch matches and blends with the tonic (first musical note) of your song's key signature. When adjusting the kick's pitch, it's highly suggested that a "cent" adjustment be used. If the software/hardware sampler does not allow such fine tuning, it's possible that you may only get very close and not an exact match with the tonic. This can cause an adverse, and unwanted, secondary wave to modulate called a "beat".
By exactly tuning your kick to the tonic of your song's key, you can be confident that the kick will "sing" and resonate in harmony with your entire song. This greatly emphasizes the chord structure of the song and prevents build up of low frequency conflicts that other instruments such as bass guitar and synth bass can introduce.
Sometimes it may be difficult to identify which note/key the kick is resonating on and thus, hard to tune to your song's key.
How the Heavy-Weights make Hits
So...you produced a mad beat. The artist and record company love it. They buy it. They take it into the studio to record vocals to it. Now they're ready to mix. But...is the beat truly as hot as it could be?!? Heavy weight producers would say no! Here's why...
Too often in Hip Hop, producers make killer beats only to have artists record vocals over them that simply don't agree with the arrangement of the original beat. The problem is the lyrical ideas of the artist and the production ideas of the producer don't match on first try. when a producer sells a beat that isn't then re-arranged to better fit the lyrical performance that is recorded over it, the overall song will lose it's power due to the vocals & beat clashing.
The lesson to be learned is 90% of the time production should not end when the beat is sold. Heavy weight producers take pride & joy in re-arranging their productions to fit around vocal performances by opening up spaces for certain lyrical lines while adding in new fills & riffs in between other vocal lines. In short, professional producers sculpt their beats around vocal performances.
In fact, with the perfect combination of catchy hook vocals answered by catchy hook fills & riffs, hits can truly be born! Nothing makes a better formula for a hit than catchy "question and answer" phrasing. The problem with a lot of amateur hip hop productions is that the artist's vocals (the questions) simply run over the producer's riffs (the answers). Real producers re-pave the road and come out with hits!
5 Essential Mixes Top Producers Use
If you're serious about your career as a Top Music Producer or Engineer, then be sure to collect all of the 5 essential mixes listed below for each song you lay to the mixed master:
1) Main Master Mix - This is the main mix to be used for album, single, and radio releases. It's the mix that appeals to the widest audience of listeners.
2) Raised Vocals Mix - Just like your main master mix, only with both lead and background vocals raised in level by approximately 1 to 2 decibels. Depending on the demand for your music, industry types may request this special mix.
3) Lowered Vocals Mix - Just like your main master mix, only with both lead and background vocals lowered in level by approximately 1 to 2 decibels. Vocal performances can make or break a hit. so we recommend having this mix on hand in case you later vote against the main master mix.
4) Television Live Performance Mix - Just like your main master mix, only with no lead vocal. This mix will be used for television and other types of live performances.
5) Instrumental Mix - Just like your main master mix, only with no lead or background vocals. This mix serves as material for radio and television promotions, and also gives you the freedom to record different vocal/lyrical performances over the main instrumental mix at a later date. Also, this mix enables you to later edit & rearrange your song without having to redo the instrumental part of the main master mix. make certain you record this important mix!
Golden Secrets to a Great Mix
If you want to impress your listening audience, you've got to cover your basics when mixing your productions. Below are 6 secret methods in order to achieve a professional mix:
1) Volume Balancing - All your instrument tracks added together must represent an even/balanced structure with volume. It's easy to lend too much volume to the wrong tracks in your production. Coming up with the proper balance where each track has its own proper level is a practicing art.
2) Panorama & Placement - Whether you're mixing in stereo or surround sound, achieving a unique pan & placement for each musical track within a mix is essential. Take it from us proper sound field placement fro all tracks will reveal the detail & beauty of your entire production while, at the same time, satisfying the listener's ears with acoustic balance.
3) Frequency Spectrum - One of the biggest problems producers create for themselves is not making sure to fulfill the entire audible frequency spectrum in a mix, approximately 30hz-18khz. Too often, mixes have too many ear-piercing highs or too many muddy uncontrolled lows. Today's hit songs demand a proper mix & balance of the full frequency range. And, as a reminder, "proper balance" doesn't mean boost all knobs!
4) Effects & Dimensions - Learn to entertain and embellish your mix with subtle effects such as reverb, delay, overdrive, and chorusing. Be careful to not overdo it, but by giving a variety of the tracks in your mix their own unique ambient dimension and effect, the overall mix can become a richer listening experience.
5) Compression & Dynamics - While giving some tracks in the mix their own dynamic freedom, other tracks (particularly vocals) need more dynamic control for two main reasons. Reason one: You don't want a track to sound amateur, being too quiet to hear at one section and then suddenly too loud in another - so compress it! Reason two: You don't all the hard work you've put into track placement, EQ, and dimension to be over-masked and thrown out of balance by uncontrolled dynamics from competing tracks - so compress them!
6) Keep it Interesting - Keep it interesting and original by trying more experimental methods such as over-compressing a certain track or creating abrupt drum and/or bass mutes. If you want to try something real extreme, try your tricks on tracks that have a short presence in the song rather than on tracks that are consistently present throughout. This keeps it interesting, yet not annoying!

Since 2009, the VIP SOUNDLAB has consistently produced the highest quality royalty-free sample libraries from around the world. We are in the works of becoming a large distributor of loops, beats, drum loops, drum hits, construction kits, and sample libraries. Our Products are compatible with MPC Renaissance, MPC Studio, MPC Fly,Sony Acid, Steinberg Cubase, Digital Performer, Apple EXS24, FL Studio Fruity Loops, Apple GarageBand, Ableton Live, Apple Logic, Steinberg Nuendo, Digidesign ProTools, Propellerheads Reason, Stylus RMX,Pro Tools and more per our sounds and loops contain wav. file formats. *Images of famous people are only used for Genre models and does not Imply any endorsement or any intentional act of copyright infringement."Maschine" is a Trademark of Native Instruments and does not imply any endorsement or act of copyright infringement."AKAI" & "MPC" is a Trademark of Akai Professional and does not imply any endorsement or act of copyright infringement."ProTools" is a Registered product and Trademark of Avid and does not imply any endorsement or act of copyright infringement."Ableton Live 8" & " Ableton Live Lite" is a Registered product and Trademark of Ableton and does not imply any endorsement or act of copyright infringement."Reason 5" is a Registered product and Trademark of Propellerhead and does not imply any endorsement or act of copyright infringement. When purchasing products on www.VIPSOUNDLAB.weebly.com, you state that you agree with our Terms Of Service, Privacy Policy & License. All credit card & Pay Pal transactions are secured by 256-bit SSL encryption & Pay Pal. VIP SOUNDLAB is a Pay Pal verified company,All music,video, graphic & similar materials on www.VIPSOUNDLAB.weebly.com are property of The VIP SOUNDLAB. All trademarks are property of their respective owners. VIP SOUNDLAB / Dro Fontaine Muzick. is the complete HD Drum Kit , Controller Editor Template, Custom Maschine Kits, Custom Ableton Kits and Custom Reason Kits resource for urban & dance music producers. All products on VIP SOUNDLAB are instantly downloadable and royalty free.
Copyright ©2009-2013 VIP SOUNDLAB All rights reserved.
Copyright ©2009-2013 VIP SOUNDLAB All rights reserved.
