THE MASCHINE-INTO-TRAKTOR MISSION
With this setup I can control the Maschine’s output via one of the decks and be able to control its EQ, volume, and add Traktor effects. The loop recorder can also record Maschine loops, which can be used later on in the Remix Decks.I searched the internet high and low for an answer. Some places talked about using the full-sized Maschine and Kontrol S4, both of which have the ability to plug-in a MIDI cable , while others suggest using two computers to run his Maschine and Traktor all syncronized with an external sound card. Like many DJTT readers, I can’t afford another laptop right now – so I had to make this work with just what was available!
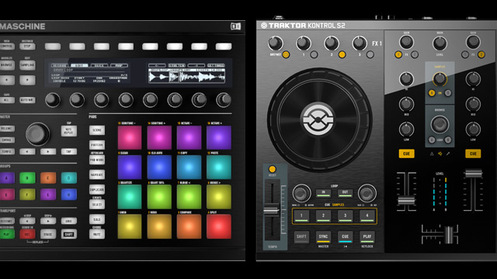
STEP ONE: GEAR UPThis setup was accomplished with my Macbook, Traktor Kontrol S2, and Maschine Mikro – so no external MIDI cable connections were possible (the Mikro and S2 don’t have the MIDI ports that other audio interfaces and controllers offer). You’ll also need:
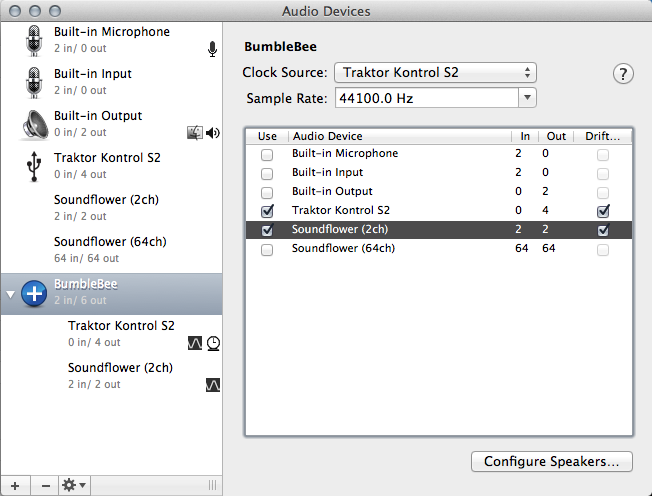
STEP TWO: CREATE AN AUDIO DEVICE Click to zoom and see the full audio device settings.
Let’s start by creating an audio device. Open up Audio MIDI Setup located in the Applications/Utilities folder. If you don’t see the audio window (image at left), use the menubar: Window>Show Audio Window.
Click on the + sign at the bottom left, and Create Aggregate Device. This allows you to create a virtual sound card with all the ins and outs you need. You can change the name by double clicking on Aggregate Device next to the big blue and white plus. I named mine ‘BumbleBee‘.
With your aggregated device highlighted, mark the ‘use‘ and ‘Drift Correction‘ check boxes for the Traktor Kontrol S2 and Soundflower (2ch).
I used Traktor Kontrol S2 as the clock source and set the sample rate to 44100 Hz (I used this setting as I’m only using MP3s).
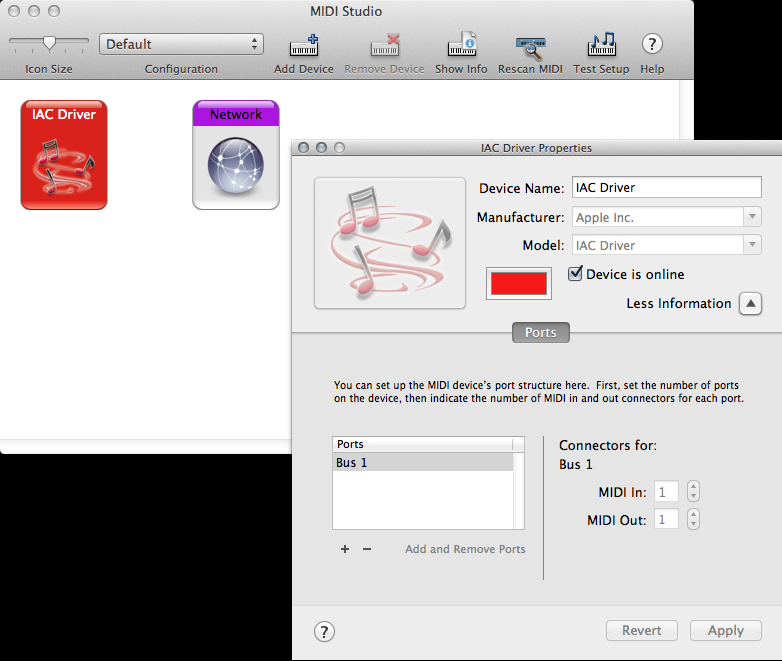
IAC Driver Settings
Still in Audio Midi Setup, go to Window>Show Midi Window – and double click on the IAC Driver icon to bring up the properties dialog. This is where you’ll create the virtual driver to be able to send the midi clock to the Maschine software. The Traktor Virtual Output is not as reliable as the built-in IAC Driver.
In the properties dialog, click the “Device is online” checkbox to make it active. Click on ‘More Information’ – by default a port called “Bus 1″ already exists. If this port is already in use by another internal MIDI routing, you can create an additional port by first clicking on the arrow next to ‘More Information’ and then clicking the + button on the bottom left of the property window. Close the Audio MIDI Setup app – we’re well on the way!
With this setup I can control the Maschine’s output via one of the decks and be able to control its EQ, volume, and add Traktor effects. The loop recorder can also record Maschine loops, which can be used later on in the Remix Decks.I searched the internet high and low for an answer. Some places talked about using the full-sized Maschine and Kontrol S4, both of which have the ability to plug-in a MIDI cable , while others suggest using two computers to run his Maschine and Traktor all syncronized with an external sound card. Like many DJTT readers, I can’t afford another laptop right now – so I had to make this work with just what was available!
STEP ONE: GEAR UPThis setup was accomplished with my Macbook, Traktor Kontrol S2, and Maschine Mikro – so no external MIDI cable connections were possible (the Mikro and S2 don’t have the MIDI ports that other audio interfaces and controllers offer). You’ll also need:
- Traktor 2.5.1 (or higher)
- Maschine 1.8 (or higher)
- Soundflower (free download)
- Audio MIDI Setup (pre-installed on OSX in Applications>Utilities)
STEP TWO: CREATE AN AUDIO DEVICE Click to zoom and see the full audio device settings.
Let’s start by creating an audio device. Open up Audio MIDI Setup located in the Applications/Utilities folder. If you don’t see the audio window (image at left), use the menubar: Window>Show Audio Window.
Click on the + sign at the bottom left, and Create Aggregate Device. This allows you to create a virtual sound card with all the ins and outs you need. You can change the name by double clicking on Aggregate Device next to the big blue and white plus. I named mine ‘BumbleBee‘.
With your aggregated device highlighted, mark the ‘use‘ and ‘Drift Correction‘ check boxes for the Traktor Kontrol S2 and Soundflower (2ch).
I used Traktor Kontrol S2 as the clock source and set the sample rate to 44100 Hz (I used this setting as I’m only using MP3s).
IAC Driver Settings
Still in Audio Midi Setup, go to Window>Show Midi Window – and double click on the IAC Driver icon to bring up the properties dialog. This is where you’ll create the virtual driver to be able to send the midi clock to the Maschine software. The Traktor Virtual Output is not as reliable as the built-in IAC Driver.
In the properties dialog, click the “Device is online” checkbox to make it active. Click on ‘More Information’ – by default a port called “Bus 1″ already exists. If this port is already in use by another internal MIDI routing, you can create an additional port by first clicking on the arrow next to ‘More Information’ and then clicking the + button on the bottom left of the property window. Close the Audio MIDI Setup app – we’re well on the way!
|
|
|
STEP THREE: TRAKTOR PREFERENCESTime to open Traktor’s preferences window – and navigate to Audio Setup on the left. Choose your new ‘sound card’ you just created, in my case I chose ‘BumbleBee’. I set my sample rate to 44100 Hz and Latency for my computer worked well at 512.
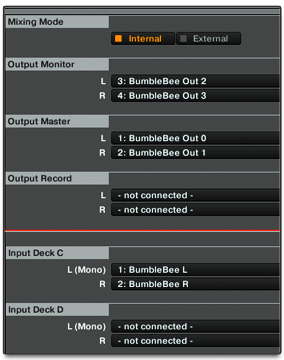
Click on Output Routing - mixing mode is set to internal. For this setup, you can follow the the list below:
In MIDI Clock Settings, turn on Send MIDI clock. I kept the sending offset to 0 ms.
In the Controller Manger section, click Add and select a Generic Midi device. The In-Port should be left with None, the Out-Port should be set to IAC Driver (Bus 1). This will send the MIDI signal to the Maschine software so it stays in sync – slaved to Traktor!
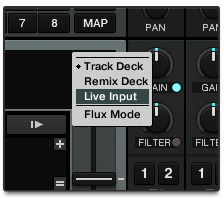
Close the preference window and click on the deck letter you would like to choose. In my example setup, we are going to be using Deck C (we also set this deck in the Input Routing settings above). In the dropdown that appears, select Live Input.
STEP FOUR: MASCHINE PREFERENCESOpen the Maschine app and go to Maschine>Preferences in the menu bar. Under General>Midi> Sync Offset Slave I set it to -52ms. This is to get your Maschine to be on beat with the Master Tempo of Traktor. Adjust accordingly and click ok.
Pro tip: a great way to check your offset is to play a simple tick/clock track in Traktor and then play a simple loop in Maschine – use the offset to align the Maschine loop to Traktor’s master track!
Click on Output Routing - mixing mode is set to internal. For this setup, you can follow the the list below:
- Output Monitor : Bumblebee Out 2/3
- Output Master L : Bumblebee Out 0/1
- Output Record is not connected.
In MIDI Clock Settings, turn on Send MIDI clock. I kept the sending offset to 0 ms.
In the Controller Manger section, click Add and select a Generic Midi device. The In-Port should be left with None, the Out-Port should be set to IAC Driver (Bus 1). This will send the MIDI signal to the Maschine software so it stays in sync – slaved to Traktor!
Close the preference window and click on the deck letter you would like to choose. In my example setup, we are going to be using Deck C (we also set this deck in the Input Routing settings above). In the dropdown that appears, select Live Input.
STEP FOUR: MASCHINE PREFERENCESOpen the Maschine app and go to Maschine>Preferences in the menu bar. Under General>Midi> Sync Offset Slave I set it to -52ms. This is to get your Maschine to be on beat with the Master Tempo of Traktor. Adjust accordingly and click ok.
Pro tip: a great way to check your offset is to play a simple tick/clock track in Traktor and then play a simple loop in Maschine – use the offset to align the Maschine loop to Traktor’s master track!
|
|

|
You’ll want to check the file menu in Maschine to confirm Sync to External MIDI Clock is ticked. This lets Traktor control when to start or stop the Maschine from looping.
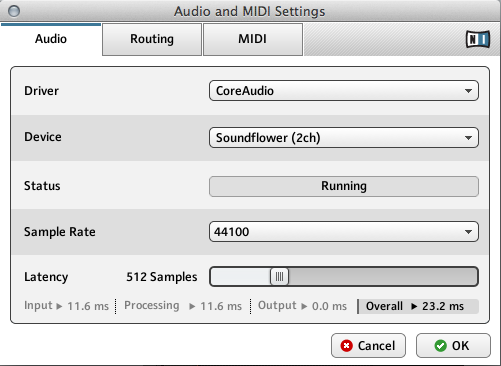
Click File again and this time select Audio and MIDI Settings. In the Audio tab, set the Driver to CoreAudio and set the Device to theSoundflower (2ch). The sample rate I set again to 44100, and the Latency at 512 Samples.
Under the Routing tab in the Audio and Midi Settings window, click Inputs, everything should be set to -not connected-. Now click on the Outputs tab and set Maschine Out 1 L to the Soundflower (2ch) L and the Maschine Out 1 R to the Soundflower (2ch) R.
Click the Midi tab and click on Inputs. You should turn everything off except IAC Driver (Bus 1). Under OutputsI just set everything to Off. Only the IAC Driver (Bus 1) in is on at this point.
MIDI CLOCK SYNCRONIZATION The Maschine should start working as soon as you start sending the Midi Clock from within Traktor. I have the MIDI clock on/off mapped to my controller’s left shift & left loop active button. Since the Maschine is now running through one of my decks I can now add effects and even use the loop recorder to be able to record any of my patterns.
To help keep the Maschine in sync, I noticed that you need to keep an eye on your BPM speeds. Maschine reads 128.3 as a BPM very well but it doesn’t adjust well to speeds like 128.34 or 128.38. I have been using this method for nearly 6 months and have found that it is very reliable.
Overall, it has been really fun being able to add a live element to my DJ sets and being able to interact with the crowd a lot more. I hope this tutorial helps you out – I know I was going crazy trying to find a solution! For other controllers, the setup will be slightly different
Sources : Dj tech tools

